
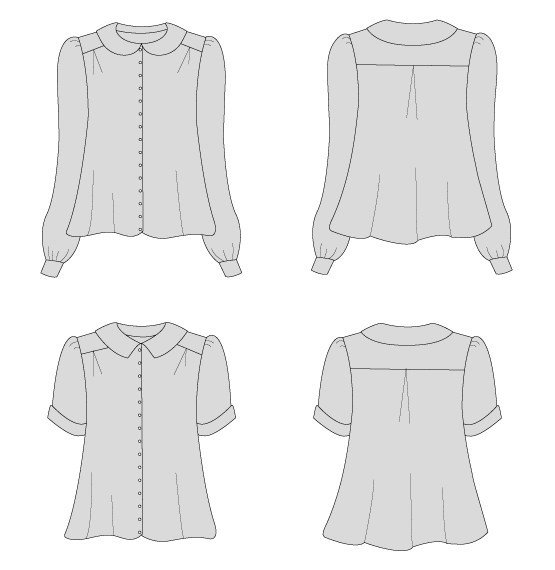
I am transforming the way I sew, becoming a beginner again. In the middle of this re-birth, I get an email from Elisalex of By Hand London asking me to test their unreleased shirt pattern. They named it Sarah. Equally honored and daunted by the offer, I took a shot at making a shirt on a two-week deadline using a pattern I had never seen before.
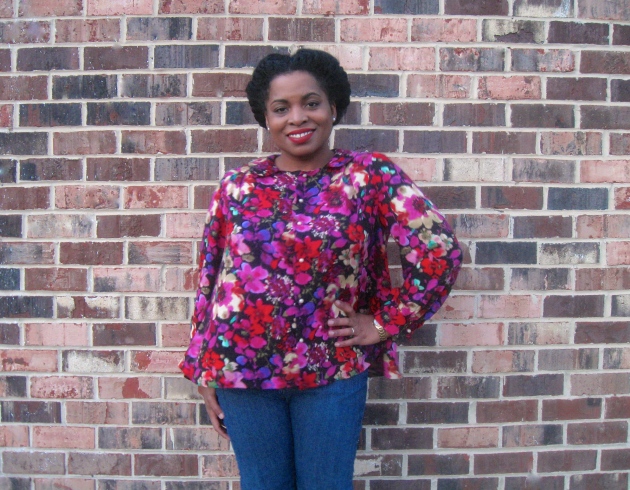
Three yards of floral challis later, Sarah and I got to know each other pretty well. And with this double test drive, I got a chance to use the Jedi sewing moves I learned in the fall from the incomparable Brooks Ann Camper.

Make It Differently
Learning pattern drafting and adopting basic couture techniques has been like a baptism for my sewing process, giving it new life and focus. Interrupting work on my own designs to sew someone else’s pattern was a strange decision to be faced with. At that moment, I had to decide what kind of seamstress I wanted to be. Now that I’m into custom drafting, does that mean all of my purchased patterns collect dust? Can what I learned even be applied to clothes I choose to make with patterns drafted for standard sizes?
These are the seven methods that anchor my sewing process now:
- Work from custom-drafted patterns that do not include seam allowances.
- Layout patterns on a single layer of fabric.
- Mark stitch lines and cut lines by hand directly onto fabric.
- Mark 1″ wide allowances for seams
- Mark 2” wide allowances for hems
- Thread mark neck, waist, and hem lines by hand.
- Hand-baste all interfacings and underlinings to fashion fabric.
- Hand-baste select seams and all hems for a pre-construction “basted fitting”.
- Machine-sew permanent seams by pre-basting with pins or thread along the stitch line before sewing directly on it (instead of using the cut edge as a guide).
I answered NO and YES, respectively to the questions about my sewing future and went on to successfully prove my hypothesis while crafting a beta version of By Hand London’s downloadable Sarah Shirt pattern.
In a future post about a different garment, I will describe how methods 2 through 7 go down for me. For now, I’ll tell you what I did to customize the shirt pattern to fit my proportions after printing and assembling the PDF pages.
Make it Work
I started out annotating the pattern’s measurement chart to note where my body measurements land – which is typically all over the map. Luckily, the drapey fit and flared hem of the shirt made my circumference check pass with ease (pun intended, as always). But without any reference to center back length or a fit model’s height, I couldn’t tell whether or not the shirt and sleeves would be too long for me. Since my height barely qualifies me for amusement park rides, this omission in multi-size patterns never surprises me.
I suppose it is a safe assumption for a pattern drafter to make that most women are much taller than five feet. So it was also safe for me to assume that the pattern had a total of 2 to 3 inches of length I didn’t need in various places. My job was to figure out the best way to find it, then remove or bypass it.
When I made a woven tee a while back from a multi-sized McCall’s pattern, I had good results blending sizes from the sleeve cap to the underarm point to bypass the extra length I’d have to remove if I’d used the sleeve size that matched my bicep circumference. This small-to-large size blending also works for bypassing extra shoulder width and chest length. So, I set out do this for the shirt’s relevant pattern pieces.

First, I had to find the shoulder point somewhere on the yoke.
There were two notches on the yoke, but neither was marked as such and with my beginner’s mind engaged, I didn’t want to guess. This was my opportunity to compare my 2-D body to the pattern using the bodice block I have been tinkering with. To prepare for this and my eventual removal of the seam and hem allowances, I marked the hidden stitching lines on the main pattern pieces (following the lines that corresponded to the sizes that best match my shape) and taped the front and back pieces to the yoke pattern as it would be sewn.

By lining up my front bodice block pattern to the center front of the shirt pattern and sliding it up to meet the top of the shirt neckline/yoke, I was able to mark the spot along the yoke where a shoulder seam would go on a shirt drafted without a yoke. From there, I did a double-check comparison to make sure the shirt’s stitch lines landed in the right place compared to my block. Where they didn’t, I found lines that did and blended them accordingly. I did the same for the yoke, back, and sleeve. This step wasn’t photographed, but here is a diagram borrowed from a Threads Magazine article that illustrates the comparison process.

Because the shirt sleeve was drafted to be gathered at the sleeve cap, it was hard to tell if there’d be too little or too much ease for me. I was also nervous about the fit at the underarm, that critical point where bust circumference, armhole height, and the ability to move your arm comfortably join forces. I wanted to ensure harmony in that area, so – after cutting off all of the seam allowances I’d drawn onto the pattern pieces – I marked, cut and hand-basted a one-sleeved mockup of the shirt sans collar, cuff, and placket.
The toile helped me discover that there was too much ease in the sleeve cap. I eliminated it by blending to a smaller size sleeve cap on the paper pattern and confirming those changes by transferring them to my muslin sleeve and re-basting it in for a final test. There was also way too much fabric at the underarm that I didn’t catch with my bodice block comparison because I was too lazy to rotate the bodice block’s bust dart to the shoulder for an apples to apples comparison. Lesson. Learned. For next time.
With confidence in the pattern’s fit, I moved on to fabric.
Make It Beautiful

I didn’t start sewing the shirt at the start of the two weeks I was given, I spent a few days deciding if the distraction was a good idea. Once I convinced myself that it was and got going, all of that handwork I would’ve scoffed at doing in the past, got done like it was a normal part of my life. Which, I think it is now. There was no hurry because every “slow motion” task was an investment in precision.
Sewing the old way feels foreign.
With the time constraint, I chose to finish the shirt’s seams with my overlocker. And, as of this writing, the shirt is missing buttonholes. To get some photos over to Elisalex in time for her pattern launch, I cleverly placed safety pins in the faux-pearl shank buttons I’m auditioning. Once Sarah is buttoned up for real, she’ll resurface here in a proper outfit. My semi-couture work on this shirt and the confidence I had during its making lets me appreciate how much my sewing has grown up.


Beautiful and it fits you well. Your skills are glowing.
LikeLike
Aw, thanks, Robbie!
LikeLike
Wow this is gorgeous and all the work you did in fitting and sewing really shows through in the final garment. Beautiful!
LikeLike
I appreciate you saying so, Meg! I’m getting the hang of this sewing thing!
LikeLike
Beautifully written as always Najah. I’m so honored to be a part of your sewing journey and to have offered a new perspective not only for your self-drafted makes, but for adapting other designer’s patterns to fit your gorgeous figure. Bravo! I can’t wait to see what’s up next for you and am very excited to work with you again in future eCourses (and someday in-person!)
LikeLike
Thank you, Brooks Ann. The perspective you offered was so damn right for me, it feels like the Force really did bring us together. I’ll be at the front of your next class ;-). XOXO
LikeLike
Nice shirt! That fabric looks great!
LikeLike
Thank you, Annabelle. Rayon challis is my BFF!
LikeLike
I loved reading about this process and the finished shirt is beautiful!
I’ve started using these steps on many of my makes recently too and, yes!, the old way just feels odd now. There’s no denying it takes more time, but the end result is so much nicer.
LikeLike
Hey, Jennifer! Thank you! I probably never told you this, but seeing your photos of thread traced muslins on Instagram was like sewing porn for me. It let me know I wasn’t the only crazy one out there trying incorporate couture into regular home sewing.
LikeLike
Pingback: When Good Girls Sew Bad(ly) | Wanna Be Sewing Something
Pingback: Pencil Me In…Denim | Wanna Be Sewing Something