
With a fool-proof strategy for binding the neckline and armholes of a sleeveless knit top, my relationship with the summer heat finally caught a cool breeze.

I found myself unprepared for the nuclear levels of heat that are happening. My selection of warm weather tops is grossly inadequate for the global baking of the earth. Any project that does not directly involve the prevention of melting has been put on hold.
Tank tops have topped my priorities.
The mission: Make my favorite t-shirt pattern sleeveless and perfect my knit wrap-around binding construction.
Fresh out of “the lab”, this stretch jersey tank is my mostly successful but still very wearable mockup to test my pattern adjustments and the execution of the knit binding technique I adapted from Marcy Tilton’s book. It produces a smooth edge that hugs the neckline.

Before I binge-sew a hundred more (yeah-yeah, I know…it will be more like, three), I wrote a little construction guide to help me repeat (and improve) my binding results on the next tops – which might have different neckline depths or shapes. For those of you with wardrobes as vulnerable to heatwaves as mine, this could come in handy.
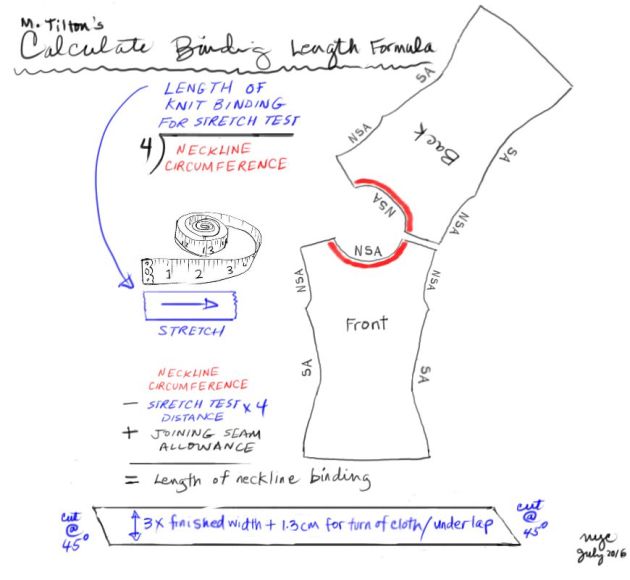
- Measure. Measure seam allowance-free neckline and armholes, front and back. Record totals. Divide neckline circumference by 4 to get the length of the test strip for finding the fabric’s optimal neck-to-binding ratio.
- Stretch. Cut a 5 cm (2-inch) wide by test strip length piece on the crossgrain. Stretch it along measuring tape in a 1 to 1 ratio to see how far it can stretch before the fabric gets distorted.
- Calculate. Multiply the stretch distance (e.g., 1cm) by 4, subtract it from the neckline circumference, and add the total seam allowance for the binding’s join to get the final length of neckline binding. Repeat the calculation with the armhole circumference for its binding length.
- Miter. Cut binding lengths by preferred width —3 times finished width plus 1.3 cm (1/2 inch) for turn of cloth and underlap — and cut short ends on a 45 degree angle. Sew the ends with a 1cm seam, press seam open, then trim allowance to reduce bulk.
- Quarter. With seamed and finished shoulder seams, divide the neckline and binding into quarters (without using the binding’s seam as a marker), and snip tiny notches. Keep the binding’s seam off-center at the back, match and pin it to the neckline at the snipped markers, right sides together with binding on top so feed dogs can ease in the longer neckline to the smaller binding.
- Sew. Set machine to a slight zig zag stitch, stretch the binding strip slightly while sewing between each pin.
- Wrap. Wrap it to the wrong side, smoothing the binding over an even seam allowance. Press over a ham from the front side, pinning along the way. Turn underlap edge under, overlock it, leave it as-is, or pink it (my favorite option so far).
- Secure. Sew the binding in place by stitching in the ditch from the front side with an edgestitch foot (or by hand for extra invisibility).
- Repeat. Carry out steps 5 through 8 for the left and right armhole bindings.

The status of this mockup as a wearable muslin was sealed when I forgot to check the placement of the binding’s joining seam. Ideally, one would place it inconspicuously. For the neckline: in the back, off-center. For the armhole: in line with the side seam. On my right armhole, it landed aimlessly near the shoulder seam.
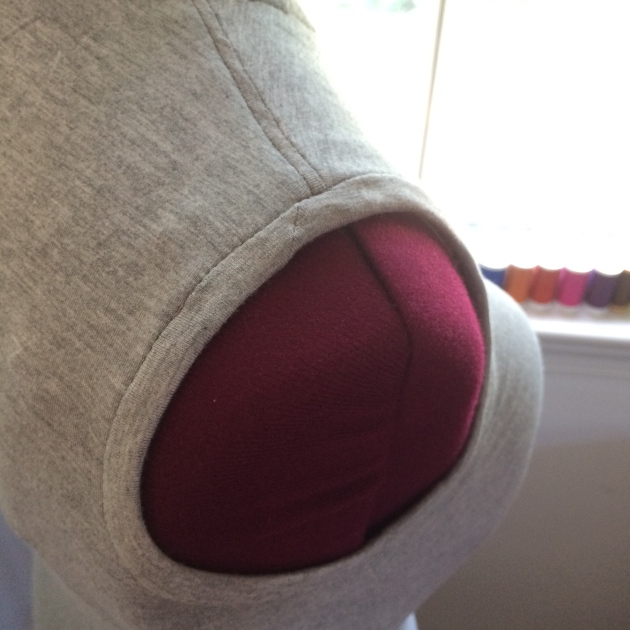
If you walk around from that point to the front and squint your eyes, you can see the neckline binding’s mitered seam loitering about near the top of the shoulder.

Hardly noticeable unless you find yourself close enough to my neck to kiss or bite it. My potential critics are: my husband or Dracula. Luckily, neither will care given their business in that area.
I rewarded my triple binding work with a simple, lazy zig-zagged hem.

If it’s possible to have a crush on a sewing technique, I certainly have one on this wrap-around binding. It elevates the status of a tank top to more than just a color peeking out from under a cardigan….it becomes a hand-wrapped license to bare arms.
Are you sewing yourself cool this summer? How do you finish the holes of your sleeveless garments? Do you turn, bind, or band?


Wow, so simple yet so effective. Very impressed!
LikeLike
Thanks, Deb! It is surprisingly simple once the right ratio is all figured out. I tend to sew similar kinds of knits, so my 1cm per quarter stretch factor will rarely change. The most work will be in remembering to to hide the binding seam ;-).
LikeLike
Very Nice!
LikeLike
Glad you like it, Robbie. Thanks.
LikeLike
Good work. Me I usually turn, but then I am not very good with jersey.
LikeLike
Thanks, Kate. I’m trying to get better at sewing jersey for t-shirt sewing, hence the mockup. There are so many jersey wadders in my history (and not enough wearable t-shirts in my closet), it was time to slow down and absorb a few skills.
LikeLiked by 1 person
Your bindings are immaculate!
LikeLike
Thank you, Faye.
LikeLike
You are so organized! Also, I forgot to thank you for reviewing Skirt Skills; it was that review that led me to take the skirt skills and smarty pants courses. I haven’t actually worn any finished items but it has revolutionized my sewing!
LikeLike
Hey, Marnie!! I thought it was you….saw your first name and was like -is that Marnie from class? – Yes, it’s you! Thanks for the note. I am SOOOOOO HAPPY to know the impact the courses have had on your sewing. I feel the exact same way…the revolution continues with every project. Even this jersey tank top benefitted from what I learned – making a garment plan, single layout, pattern alterations, etc.
Let’s keep in touch. There’s so much to sewing revolution talk to do outside of class!
LikeLike
Those bindings are sitting so neatly – you should definitely make 100. OK, maybe start with three!
LikeLike
Ha! Why do we always get one-woman factory fantasies when garments turn out right? Having a hundred tank tops would be a storage and laundering hassle and actually sewing them would bore us out of the hobby! Proof that sewing is a drug that produces irrational behavior. But, I don’t need an intervention….unless someone wants to give me more time to sew 😉
LikeLiked by 1 person
Knit fabrics turn me into a sweaty mess of trembling fear, but I’m determined to get better at sewing them. This is a great explanation, thank you!! x Allison
LikeLike
You are welcome, Allison. I have to cringe-bust my apprehension for sewing knits every time I cut into a new project. That’s why I get all type A about my approach. Thanks again for the note – forgive the belated reply ;-).
LikeLike
Okay, loving this binding technique!!!! It makes so much sense, and mitering the corners in advance means you can apply it in the round — much neater than binding the neckline/armholes before they are closed. Thanks for sharing.
LikeLike
Glad you like the binding technique, Ebi! I still want to try the one where you sew the shoulder seam last, but this one (the scenic route) turns out so nice, I may never get around to the trying the fast and fun way. When I do, I know you’ll help me get it right!
LikeLike
Pingback: Paisley Park | Wanna Be Sewing Something